Grafana supports several notification channels for alerts. There are some messenger services available like Telegram or Threema Gateway. But Grafana does not support notifications by Nextcloud Talk out of the box.
In this post you can read how to set up such notifications.
What you should already have configured:
- Grafana Server
I have version 7.0.3 but others should work, too. - Nextcloud Server
Talk App needs to be active - Nextcloud Talk App
installed on your Smartphone - Webserver with php activated
could be the same physical server as your Nextcloud server
First we configure Nextcloud to receive the notifications:
Create a new user (e. g. „Chatbot“) with a strong password. This user will send us the alert messages.
Then you log in to the Nextcloud server with the user who should receive the notifications. Go to the Talk app and create a new chat. Name it „Alerts“ or any other name.
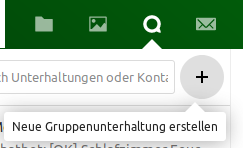
In the second step you are asked to invite users to the chat. Select the newly created user. You can also add further users.
When your chat is open in the browser have a look at the URL. It should look like this:
https://<your-server>/nextcloud/call/<chat-id>Remember the chat-id. You need it later to configure the php-script.
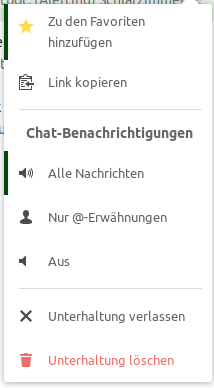
To get always a notification when a new message is posted go to the chat options on the left side and set the notification option to „all messages“.
Now install the Nextcloud Talk app on your smartphone and configure server connection. You should see the chat.
In the next step we will create a php-script on our webserver. It receives the alert from grafana by webhook notification and uses the API of nextcloud talk to write a message. Adapt the following php code and put it on your webserver.
<?php
$chat_user = "<new_nextcloud_user>";
$chat_pwd = "<passwort>";
$chat_token = "<chat-id>";

$json = file_get_contents("php://input");

// This can be used for debugging.
// All Grafana alert information is stored
file_put_contents("alert.log", $json);

$daten = json_decode($json);

// We select title, message and URL of the dashboard that triggers the alert
$alert_title = strval($daten->title);
$alert_message = strval($daten->message);
$alert_url = strval($daten->ruleUrl);

// This is the URL of the nextcloud chat
$url = "https://<your_nextcloud_server_url>/ocs/v2.php/apps/spreed/api/v1/chat/$chat_token";

// Initialize curl session
$ch = curl_init($url);

// fill array with data for the nextcloud chat
$data = array(
    'token' => $chat_token,
    'message' => "$alert_title:\r\n$alert_message\r\n$alert_url"
);
$payload = json_encode($data);
// set curl options
curl_setopt($ch, CURLOPT_SSL_VERIFYPEER, true);
// Following option needs to be set to false if you access
// your nextcloud server by IP instead of domain name.
curl_setopt($ch, CURLOPT_SSL_VERIFYHOST, false);
curl_setopt($ch, CURLOPT_RETURNTRANSFER, true);
curl_setopt($ch, CURLINFO_HEADER_OUT, true);
curl_setopt($ch, CURLOPT_POST, true);
curl_setopt($ch, CURLOPT_POSTFIELDS, $payload);
curl_setopt($ch, CURLOPT_USERPWD, "$chat_user:$chat_pwd");
curl_setopt($ch, CURLOPT_HTTPAUTH, CURLAUTH_BASIC);

// Set HTTP Header
curl_setopt($ch, CURLOPT_HTTPHEADER, array(
    'Content-Type: application/json',
    'Content-Length: ' . strlen($payload),
    'Accept: application/json',
    'OCS-APIRequest: true')
);
// Execute the POST request
$result = curl_exec($ch);

// Close curl session
curl_close($ch);

?>
Don’t forget to set the permissions of the script to be accessible by your webserver user.
Now the configuration of your webserver needs to be adapted to execute the php code. I have nginx running and added location tag according to nginx documentation. Don’t forget to reload the configuration afterwards.
location /html/sensor/ {
   fastcgi_split_path_info ^(.+?\.php)(/.*)$;
   if (!-f $document_root$fastcgi_script_name) {
       return 404;
   }

   # Mitigate https://httpoxy.org/ vulnerabilities
   fastcgi_param HTTP_PROXY "";

   fastcgi_pass php-handler;
   fastcgi_index index.php;

   # include the fastcgi_param setting
   include fastcgi_params;

   # SCRIPT_FILENAME parameter is used for PHP FPM determining
   #  the script name. If it is not set in fastcgi_params file,
   # i.e. /etc/nginx/fastcgi_params or in the parent contexts,
   # please comment off following line:
   fastcgi_param  SCRIPT_FILENAME   $document_root$fastcgi_script_name;
}
Final step is to set up the webhook notification in Grafana. Open Grafana and go to Alerting / Notification channels. Add a new channel and select „webhook“.
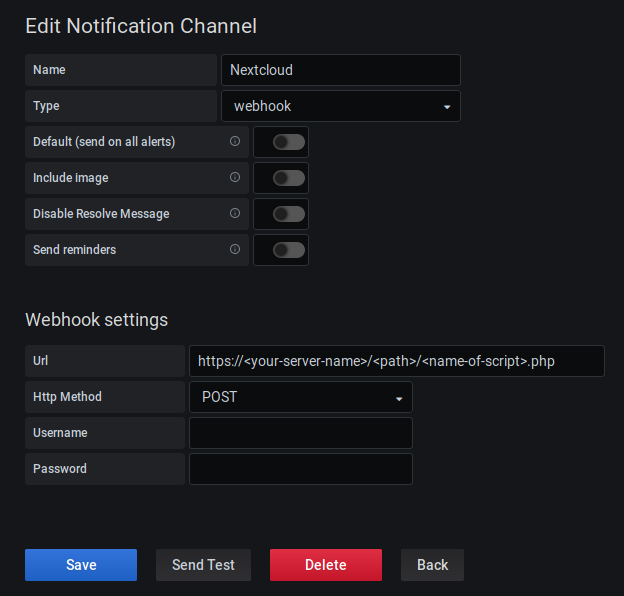
As everything is now ready and set up you can press the „Send Test“-Button. You should receive a message on your smartphone. The new created notification channel can now be used in Grafana to trigger alerts.
Thanks, this is still a good option in 2025, and your PHP script works with the latest Nextcloud Talk. Grafana’s „Notification Channel“ is now „Contact Points“ but the defaults work except for adding the script URL and setting Payload to „webhook.default.payload“ for a start.